We are sponsored today by the fabulous Sparkle Creations Rubber Stamps and Sparkle is offering up a very generous prize to not only our winner but our participants also!!! The winner gets a $15 store voucher to Sparkle Creations and all of the participants can use the coupon code "10COLORME" to receive 10% off their purchases during the contest.
_________________________
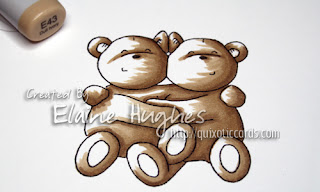
I wanted to use this post to show two different styles for colouring teddy bears/animals. I like to use both techniques, depending on the style of the image. The smooth blending technique is ideal for images like the Elzybells Teddy Bears or similar styles such as Forever Friends. The textured style works nicely for the Critter Crew images from The Greeting Farm, or bears like Popcorn the Bear etc.
Style 1: Smooth Blending
This is probably the technique I use most often, and the method of colouring is the one I use for most things. I work from dark to light, and rather than laying down colour in a circular motion, I tend to work in strokes (although I do use both techniques).
Copic Markers used: 0, E41, E43, E44,
1. First I like to pick out all the darkest areas and shadows in my darkest shade, in this case E44. I tend to use smooth strokes following the lines of my image.
2. Then I lay down my next shade, which in this case is E43. At this stage you don't need to really try and blend, just lay the colour down, going a little over and working out from the darkest shade. I used smooth, light strokes following the direction I want to blend out into.
3. Next I lay down my lightest shade, in this case E41, not worrying too much about blending fully. In this example I have covered all of the white spaces as I don't want really defined highlights.
4. While my lightest shade is still fresh, I work backwards and blend the layers further - first blending E43 from the darkest area into the still fresh light areas, then blending E44 into that. You can repeat this until you're happy with the blending. Finally, I like to go back in and add a little extra definition to some of the shadows with my darkest shade.
Style 2: Textured
The key to this style of colouring is not to try and be too precise or perfect. I always find that the looser and less careful I am, the easier this technique comes. Practice light, feather strokes and don't be afraid to play around. Vary the length of your strokes a little, try not to make them uniform. And remember, it will look pretty messy until you start blending and softening the lines.
You will notice that I haven't tried to cover the whole bear, but have given the impression of fur by applying the technique mostly to the outer edges.
Copic Markers used: E30, E34, E35, E57, E59
1. Sticking mainly to the outer edges and starting out with second darkest shade, in this case E57, I used short, light strokes in the direction I visualise the fur lying.
2. Using E35 I went over the same areas, adding in more short, feathered strokes.
3. Using my darkest shade - E59 - I used the same light strokes to add some darker detail. These are to add a little extra depth of colour, so add them sparingly!
4. Using one of the lighter shades - E34 - I laid down some broader strokes to start gently blending the colours. I did this fairly lightly as I wanted to soften the lines a little, not completely blend them and lose the texture.
5. Using the lightest shade - E30 - I covered all of the fur, further softening and blending, but again being careful not to completely blend out the strokes I laid down earlier.
That's it! Two different looks to play around with that work for teddy bears or real animals. Hope you enjoyed the tutorials!
-Elaine
Challenge Fine print:
Make a project using Elaine's teddy bear/animal coloring techniques
New creations only (we check)
New creations only (we check)
You can use any stamps you'd like (just make sure it has a teddy bear/animal, obviously)
Link it up here by October 7th
Winner will be chosen by random.org
DT will pick some of our favorite creations to showcase
Thanks for joining us!
~The CMC Team~
Thanks for joining us!
~The CMC Team~


4 comments:
Great tutorial Elaine! Both techniques are awesome. I'm going to try both out and see how it works. Thanks for the tips!!
Wonderful tutorial, Elaine! Love both versions--must try the "furry" one on a Toby, too! Thank you!
What a great tutorial!
I will try these :) Thanks!!
Hugs Anneke
Oh, this is great, especially the one with the furrr... And, where have I been? It's already challenge 5!!
Post a Comment