INSERT ALTERNATIVE TEXT FOR YOUR HEADER IMAGE HERE

Sunday, November 7, 2010

Skin/Makeup Challenge - Winners & Showcase!

Before we get into the winners and favorite card showcase, I would like to let everyone know that we'll be taking a break here at CMC for awhile.  We're not shutting down or anything, don't panic, lol! It's just the busy time of the year and we need to set up more content for you guys so don't worry if you don't see us posting anything new for awhile :0)

Onto the challenge!!!!

Congrats to Shirley and Jenny, you both one a pack of the XPress it paper from Mad For Markers!  Please email us at colormecopicatgmaildotcom with your address and we'll get your information out to Sammi!

Some DT favorites:
 Kristy

Alaine

Tasha

Thanks!
~The CMC Team~

Friday, October 22, 2010

Coloring video by...Kelly Booth!

If you are out and around in blogland, you've most likely seen Kelly Booth before and she is our fabulous Guest Contributor today! She's made a fab video on coloring in faces and doing "makeup" on your stamps.

Mad for Markers

It's also time for another challenge! This time around we are being sponsored by the fabulous Sammi from Mad for Markers in Austrailia!  Sammi has offered up 2 packs of the NEW Xpress IT blending card (20 sheets cut to A5 size), so this time around we'll have TWO winners and each winner will get a pack! Xpress It is just recently available to us in the US but we've already been hearing raves about it from those who are lucky enough to have used it already.  Now, onto Kelly's tutorial! (Challenge details below)

Kelly Booth

Hi My name is Kelly Booth I currently live in Northern California with my husband and dog Xenia. We will be moving to Arizona next month  to be closer to my Grandchildren and my girls.  I have always loved to color and paint. I discovered Copic Markers a little over three years ago and have not turned back since.  I was able to get Copic Certified last year and hope to  take the intermediate Certification when it comes around.  

Here's Kelly's fabulous video, thanks SO MUCH for sharing with us all Kelly!

Images by: The Greeting Farm


Challenge Fine print:
Make a project using Kelly's face/makeup coloring technique
New creations only (we check)
You can use any stamps you'd like (just make sure it has an animal, obviously)
Link it up here by November 5th
Winner will be chosen by random.org
DT will pick some of our favorite creations to showcase

Thanks for joining us!
~The CMC Team~
Thursday, October 21, 2010

Challenge #6 - Winners and showcase!

Hopefully you guys all got your entries in for Elaine's Challenge #6 because if not, you missed out on a chance at TWO awesome prizes from SCACD

Our two winners are:
Prize #1 (Elisabeth Bell set) - #33 Coleen!!
Prize #2 (Victoria Case set) - #12 Brenda!!

Congratulations ladies, please email us at colormecopic@gmail.com with your names and addresses and we'll get your info out to Susana :0)  Enjoy all your awesome new stamps and thanks to everyone who took part in the challenge, there were LOTS of great entries.

Some DT favorites:
Michelle

Jacqui

Alaine


Thanks so much!
~The CMC Team~

Friday, October 15, 2010

User Question - Snow/Ice?

A reader wrote and asked us what our methods for coloring snow/ice are.  Here's what some of the team had to say:


Amy:
When I'm coloring snowmen most times I use BG0000, BG000, 0 but I've also used G0000, G000, B000, 0 for snow scenes and especially icicles.


Elaine:
Well, I mostly just use B0000 and B00 around the edges and in shadow areas.


Rachel:
I use the same colors for snow as I do for coloring things white: B0000, B000, B01.  B01 for the darkest parts & shadows and then blend it out to white with the other two colors.

Kim:
I would use B0000 & B00 for icy areas, BV20, BV23, BV25 for a darker purple shadows, E40, E41 for a warmer snow and C0 for light shadows... I would blend heavily with my colourless blender to blend and push these colours out. A little clear spica glitter enhances the snow glistening too!
_____________________________________

Don't forget to check out the FABULOUS challenge we have going currently, you could win one of two huge stamp sets from SCACD!  Only 5 days left!

Thanks!
~The CMC Team~

Saturday, October 9, 2010

Challenge #5 Winners and Showcase

The winner of the $15 store credit to Sparkle Creations rubber stamps is.... Belz, please email us at colormecopic@gmail.com so we can get your info!  Thanks so much to all who played along and make sure to check out our current challenge because we've got some HUGE prizes you can win :0)

Here are some DT favorites:
Belz

Cindy

Forgotten Scraps

Thanks!
~The CMC Team~

Friday, October 8, 2010

Coloring Clothes with Copics & a HUGE Challenge!!

We all love those stamps that are really beautiful and have wonderful, elaborate clothing, BUT it can be intimidating for even the most Copic competent person out there to know how to shade correctly! Sooooo... Elaine has put together a wonderful tutorial on how to coloring the folds of clothing using Copics :0)


Susana from SCACD graciously sent the DT a stamp to demonstrate Elaine's technique, and we each used one from the exclusive line of stamps Susana has HERE. AND SCACD is offering up two HUGE and completely fabulous prizes this time so there will be TWO winners and just LOOK at what you can win: Details HERE for set #1 and HERE is set #2!!!


Yes, that's right, one person will win the first set and another will win the second set and how cute are those stamps?? Challenge details are at the bottom of the post, with a prize like this you guys need to take part!!!

**************************************************************
Elaine's Tutorial


The new Elisabeth Bell for SCACD stamp - Angel of Hope - was a perfect choice for this tutorial. Check out that gorgeous dress! Full details on the finished card can be seen in my personal blog post - Angel of Hope card.

Copic Markers used: YR0000, Y21, Y26, Y28
1. Firstly, you will need to decide on the direction of your light source, and where your shadows will be. Pick out these areas using your darkest shade - in this case Y28.


2. Using the next marker down - in this case Y26 - lay down the colour slightly overlapping the shadow areas. I tend to use light strokes, feathering out from the shadow areas. Don't worry too much about blending at this stage, it will look messy but you can deal with that later!

4. Using the next lightest shade - in this case Y21 - lay down colour overlapping the last layer, moving in light strokes towards the area where you want your highlights, leaving the desired highlight area white.

5. Go back over the image again, starting with your darkest shade (Y28) to deepen the shadows, and working back as before with your other shades (Y26, Y21), this time taking a little more time to blend the colours. How long you spend on this depends on the depth of colour and shadow you want to achieve, just be careful not to over-saturate your paper!

6. Finally, I like to soften the highlight areas and blend the last layer of colour out a little using one of the lightest shades - in this case YR0000 (I find the 0000 markers extremely useful for this). I may also finish off by adding a little more Y28 into some of the shadow areas to add a little extra depth.

Note on Wings:

Angel of Hope has beautiful wings, so a quick note on those!

I really like E40, E41, E42, E43 for a nice soft natural look to feathers. Here I have used E41 and E43.

1. Pick out shadow areas and areas where you want a little extra colour with your darkest shade - in this case E43.


2. With a lighter shade - in this case E41 - go over the shadow lines and blend outwards using a light feathered touch.

That's it! You may want to blend more and then deepen the shadows by going back in with E43. On the finished example I spent a little more time blending with E41, and then finished off with a touch more E43 in some of the detail areas to add extra depth. Play around and see what works for you! Don't worry about making it perfect - you want a slightly textured, soft and natural look.

**************************************************************
DT Samples

Amy Young
Rach

Traci


**************************************************************

Challenge Fine print:
Make a project using Elaine's clothing coloring technique
New creations only (we check)
You can use any stamps you'd like
Link it up here by October 20th
Winner will be chosen by random.org
DT will pick some of our favorite creations to showcase

Thanks for joining us!
~The CMC Team~

Tuesday, September 28, 2010

Elaine's Bear/Animal Coloring Tutorial + Challenge #5

Elaine from Quixotic Cards has made us a fabulous tutorial on how to color teddy bears/animals with Copics! If you have seen Elaine's personal blog or store blog, you are missing out on some of the best coloring out there in blog land :0)  Today's tutorial also marks...challenge #5!


We are sponsored today by the fabulous Sparkle Creations Rubber Stamps and Sparkle is offering up a very generous prize to not only our winner but our participants also!!! The winner gets a $15 store voucher to Sparkle Creations and all of the participants can use the coupon code "10COLORME" to receive 10% off their purchases during the contest.
_________________________

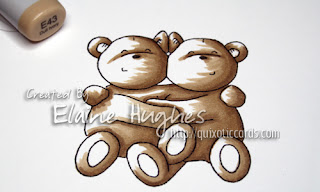
I wanted to use this post to show two different styles for colouring teddy bears/animals. I like to use both techniques, depending on the style of the image.  The smooth blending technique is ideal for images like the Elzybells Teddy Bears or similar styles such as Forever Friends.  The textured style works nicely for the Critter Crew images from The Greeting Farm, or bears like Popcorn the Bear etc. 

Style 1: Smooth Blending

This is probably the technique I use most often, and the method of colouring is the one I use for most things.  I work from dark to light, and rather than laying down colour in a circular motion, I tend to work in strokes (although I do use both techniques).

Copic Markers used: 0, E41, E43, E44,


1. First I like to pick out all the darkest areas and shadows in my darkest shade, in this case E44.  I tend to use smooth strokes following the lines of my image.

2. Then I lay down my next shade, which in this case is E43.  At this stage you don't need to really try and blend, just lay the colour down, going a little over and working out from the darkest shade. I used smooth, light strokes following the direction I want to blend out into.

3. Next I lay down my lightest shade, in this case E41, not worrying too much about blending fully.  In this example I have covered all of the white spaces as I don't want really defined highlights.


4. While my lightest shade is still fresh, I work backwards and blend the layers further - first blending E43 from the darkest area into the still fresh light areas, then blending E44 into that.  You can repeat this until you're happy with the blending.  Finally, I like to go back in and add a little extra definition to some of the shadows with my darkest shade.


Style 2: Textured

The key to this style of colouring is not to try and be too precise or perfect.  I always find that the looser and less careful I am, the easier this technique comes.  Practice light, feather strokes and don't be afraid to play around.  Vary the length of your strokes a little, try not to make them uniform.  And remember, it will look pretty messy until you start blending and softening the lines.

You will notice that I haven't tried to cover the whole bear, but have given the impression of fur by applying the technique mostly to the outer edges.

Copic Markers used: E30, E34, E35, E57, E59

1. Sticking mainly to the outer edges and starting out with second darkest shade, in this case E57, I used short, light strokes in the direction I visualise the fur lying. 

2. Using E35 I went over the same areas, adding in more short, feathered strokes.

3. Using my darkest shade - E59 - I used the same light strokes to add some darker detail.  These are to add a little extra depth of colour, so add them sparingly!

4. Using one of the lighter shades - E34 - I laid down some broader strokes to start gently blending the colours. I did this fairly lightly as I wanted to soften the lines a little, not completely blend them and lose the texture.

5. Using the lightest shade - E30 - I covered all of the fur, further softening and blending, but again being careful not to completely blend out the strokes I laid down earlier. 


That's it!  Two different looks to play around with that work for teddy bears or real animals.  Hope you enjoyed the tutorials!
-Elaine


Challenge Fine print:
Make a project using Elaine's teddy bear/animal coloring techniques
New creations only (we check)
You can use any stamps you'd like (just make sure it has a teddy bear/animal, obviously)
Link it up here by October 7th
Winner will be chosen by random.org
DT will pick some of our favorite creations to showcase

Thanks for joining us!
~The CMC Team~

Monday, September 27, 2010

Winner and showcase!

Once again, you've all outdone yourselves! Glad you guys loved Amy's video so much and tried out something new.  Without futher adieu, our winner (via random.org) is....Michelle!  Congrats Michelle and make sure to email us at colormecopic@gmail.com with your address info and stamp choice (see your choices HERE) and we'll send it on to SCACD.

Here are some of the DT favorites:

Craftymummy2five

JamieN
 Melissa Made

Thanks to everyone for playing and stay tuned later this week for another tutorial and challenge!
~The CMC Team~

Friday, September 10, 2010

Straight hair tutorial by Amy Young + Challenge #4!

The fabulous Miss Amy Young over at A Thousand Sheets of Paper has put together another AWESOME hair coloring video, this time it's on doing the "feathered" hair look on straight hair.  And it's also time for Challenge #4! We want you to try out Amy's straight hair technique :0)

We are also SUPER lucky to have the super sweet Susana over at Susana's Custom Art and Card Design (SCACD) to sponsor us this week!  She is offering up an awesome prize: one of the super cool new Viva Decor Pearl pens in Ice White and also a free single rubber stamp from one of the SCACD exclusive stamp lines, which you can see HERE.
__________________________________________

On a side note, if you have info or tutorials you would like to see the team cover please make sure to write it in the comments section or email us at CMC, we want to know what you guys want/need!


Image by: Tickled Pink (LE Kellita)

Challenge Fine print:
Make a project using Amy's straight hair technique - any straight haired stamp, does not have to be a "big head" (as Amy puts it)
New creations only (we check)
You can use any stamps you'd like
Link it up here by September 24th
Winner will be chosen by random.org
DT will pick some of our favorite creations to showcase

Thanks for joining us!
~The CMC Team~


Thursday, September 9, 2010

Challenge #3 winners & Showcase!

We're SO glad that you guys enjoyed Amy's straight hair tutorial so much!!!  If you liked that one, stayed tuned tomorrow ;0)

Thanks to all our participants and without further ado our winners (care of random.org) are....
Jessamine - Julie T
Caladium - Carisa
Congrats!!!  Please email us at colormecopic@gmail.com with your addresses and we'll get your stamps sent out!

Here's just a few of our favorite curly-haired entries!

Amber Hight

Ruby 2 Shoes

Leanne Poe


Thanks!
~The CMC Team~

Friday, August 27, 2010

Curly Hair Video Tutorial by Amy Young!! Challenge #3

The fabulous Miss Amy Young over at A Thousand Sheets of Paper has put together an AWESOME video on how to color curly hair! We all know how well she colors and she was kind enough to use some of her vacation time to try and help the rest of us out ;0) This also marks Challenge #3 here at CMC - We are challenging you to try your hand at coloring curly hair!


Sweet November is also sponsoring this challenge! There will be TWO winners this time and each of them gets a new stamp that you haven't even seen yet from Amy's upcoming "Twisted Sisters" line ;0) If you like these gals make sure to stay tuned to Amy, Traci & Rachel's blogs starting on August 31 for Sweet November previews and to see three more of her new fairies!

Prize #1 Jessamine

Prize #2 Caladium

Image by: The Greeting Farm

Challenge fine print:
Use Amy's curly hair technique on your project of choice
NEW creations only (we check)
You can use any stamps you'd like
Link it up here by September 8th
Winners will be chosen by random.org
DT will pick some of our favorite creations to showcase


Thanks for joining us!
~The CMC Team~


Thursday, August 26, 2010

Challenge #2 - Winner & Showcase

Thanks to all those who participated, you all really nailed the technique, we were very impressed.  I used random.org and it came up with...#10 the fabulous MacKenzie! Congrats MacKenzie, email us @ CMC and we'll get your prize to you :0)

STAY TUNED TOMORROW for our next challenge!! Amy Young has some fun stuff for us....and yes, that's all the hint you get, lol.  You'll really want to check out this challenge though.

Here is the showcase of some of our fave entries (in no particular order):

By Leanne Poe

By Donna Mikasa

By MacKenzie Bruckler

Thanks!
~The CMC Team~