INSERT ALTERNATIVE TEXT FOR YOUR HEADER IMAGE HERE
Showing posts with label Guest Contributors. Show all posts

Friday, October 22, 2010

Coloring video by...Kelly Booth!

If you are out and around in blogland, you've most likely seen Kelly Booth before and she is our fabulous Guest Contributor today! She's made a fab video on coloring in faces and doing "makeup" on your stamps.

Mad for Markers

It's also time for another challenge! This time around we are being sponsored by the fabulous Sammi from Mad for Markers in Austrailia!  Sammi has offered up 2 packs of the NEW Xpress IT blending card (20 sheets cut to A5 size), so this time around we'll have TWO winners and each winner will get a pack! Xpress It is just recently available to us in the US but we've already been hearing raves about it from those who are lucky enough to have used it already.  Now, onto Kelly's tutorial! (Challenge details below)

Kelly Booth

Hi My name is Kelly Booth I currently live in Northern California with my husband and dog Xenia. We will be moving to Arizona next month  to be closer to my Grandchildren and my girls.  I have always loved to color and paint. I discovered Copic Markers a little over three years ago and have not turned back since.  I was able to get Copic Certified last year and hope to  take the intermediate Certification when it comes around.  

Here's Kelly's fabulous video, thanks SO MUCH for sharing with us all Kelly!

Images by: The Greeting Farm


Challenge Fine print:
Make a project using Kelly's face/makeup coloring technique
New creations only (we check)
You can use any stamps you'd like (just make sure it has an animal, obviously)
Link it up here by November 5th
Winner will be chosen by random.org
DT will pick some of our favorite creations to showcase

Thanks for joining us!
~The CMC Team~

Friday, August 20, 2010

Creating Concrete and Grass Background

The super sweet and fabulous MazKenzie has provided another awesome tutorial for us today on how to create concrete sidewalks and grass!

MacKenzie Bruckler

Today I thought I'd share a simple tutorial on how I drew the sidewalk and grass on the card below. Using a Copic multi-liner pen and a straight edge, draw in a sidewalk.
Continue until your sidewalk is the size you want it.
Here's what mine looked like when I was done.
Start with a Copic C7 and go around all the edges.
(I use the chisel tip for all of these steps)
Next, blend in C5 around the edges.
Finally, fill in with C3.
Easy-Peasy!


I usually like to add a little grass also.
To do that, I make a thick line with the chisel tip of YG17.
(This will help avoid white spaces in between your blades of grass)
Choose a darker shade of green, and make small strokes with the brush tip.
Then fill in with various shades to finish off.
Here's what my finished image looks like.
I really hope this was helpful! Give it a try!
Thanks for stopping by.


Images by Pink Cat Studio

Friday, August 13, 2010

Lysa's Black Hair Video Tutorial

Please welcome our Guest Contributor, Lysa from Lysa's Crafty Creations!


My name is Lysa and I LOVE everything about being crafty. I've been stamping & scrapbooking for about 6-7ish years now, and you can find me in my craft room any spare moment I get!

I 'discovered' Copics about 2 years ago- and got my first set of 72 from my husband for Christmas that year and haven't looked back since! I am not Copic certified- I've learned everything I know from blogs and videos and adapted them into my own style.


Here's her FABULOUS video on how to color "shiny" black hair:

Friday, July 23, 2010

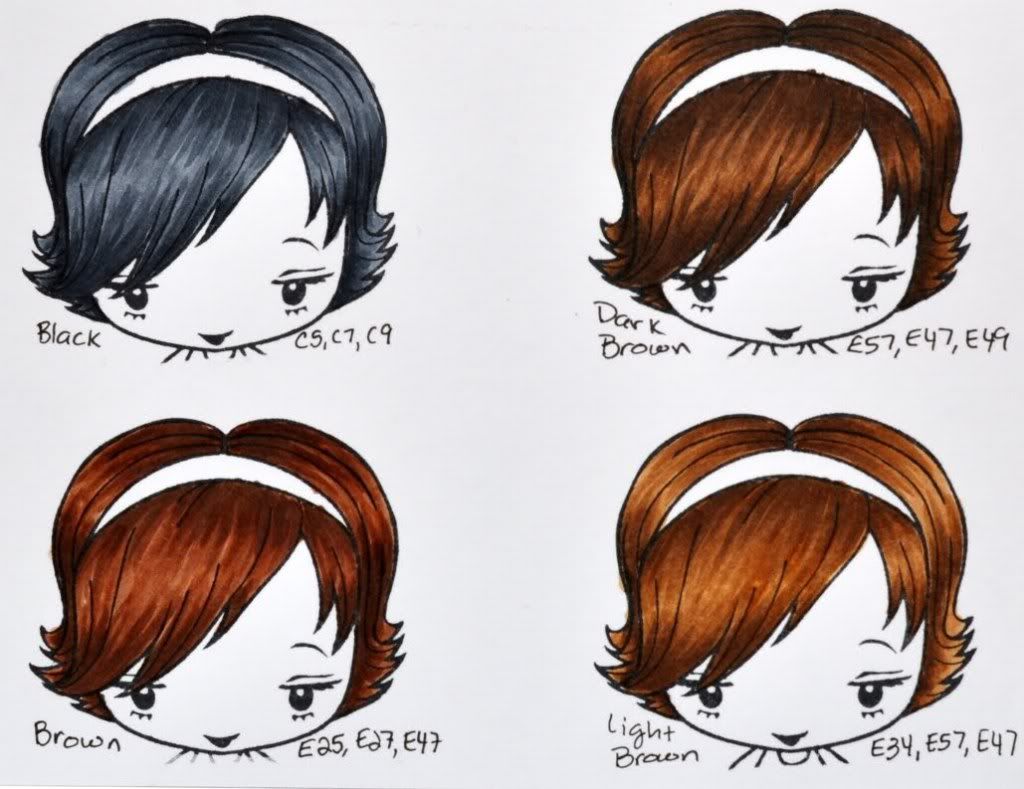
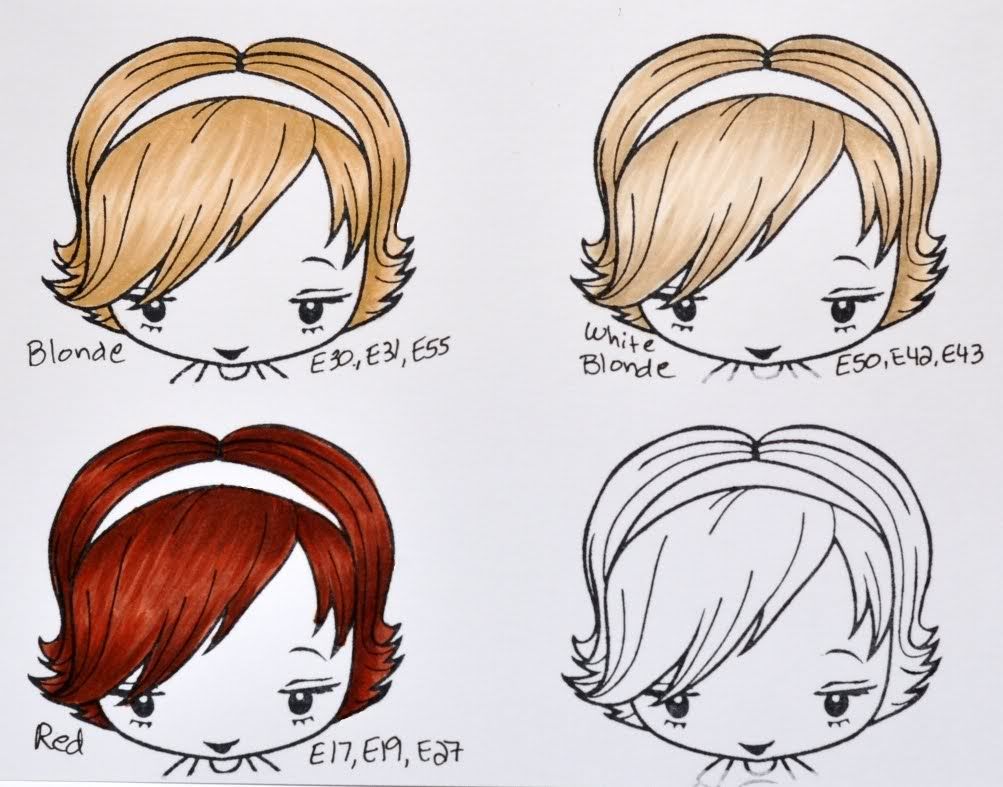
Hair Colors - By Mary Giles

Mary Giles over at A Latte Inkin' Fun is our Guest Contributor and has graciously agreed to share her hair color samples to share with us!  These give you a good idea not only of what colors she uses but how they look when colored.


Image: The Greeting Farm (Ebony)

Wednesday, July 21, 2010

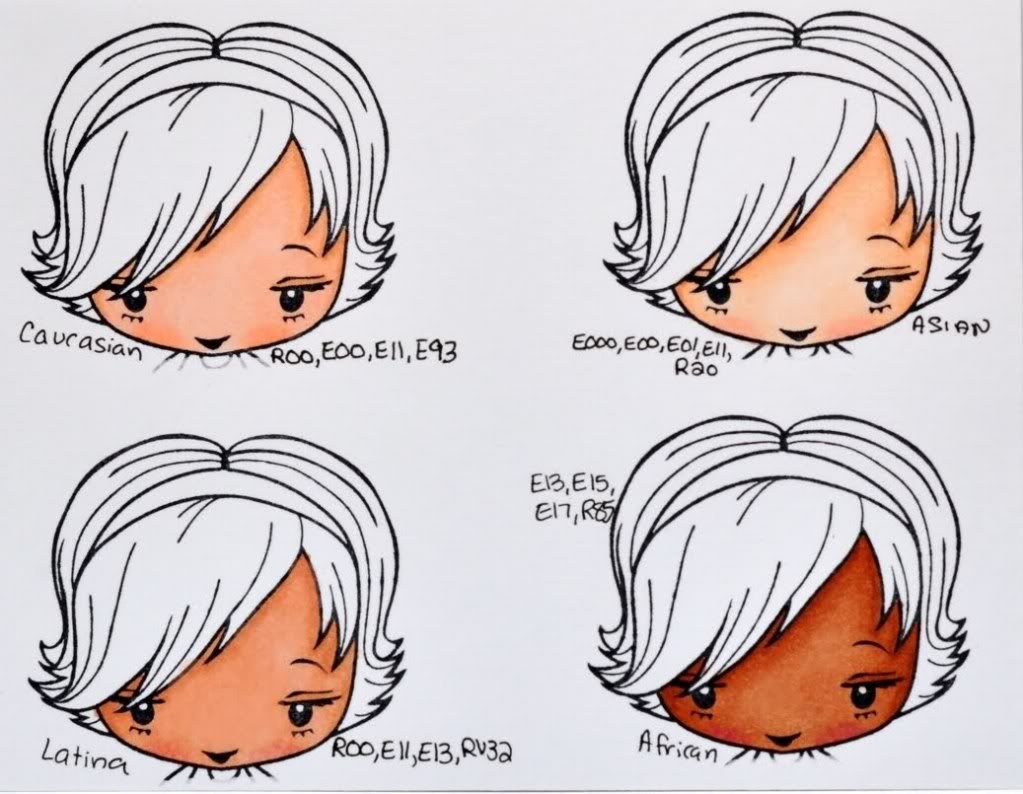
Skin Colors - by Mary Giles

Welcome Mary Giles, our Guest Contributor this week!  She has graciously agreed to share her skin color samples with us today.  Stayed tuned later this week for for hair samples, they are great!
These give you a good idea not only of what colors she uses but how they look when colored.


Mary Giles 

I got started with copics about two years ago and I bought my first 12 at Dick Blick in Ohio. I was just getting into coloring images and all I had were regular markers. I was really amazed at the creations I had seen with copics and being a gadget girl I had try them for myself. It was love at first stroke, but it did take quite awhile for me to become comfortable with them and a lot of reading and studying other people's projects. I really love how copics blend and the shading details you can get from them is fabulous. Plus you can get images done pretty quick.


 Image: The Greeting Farm (Ebony)

Friday, July 16, 2010

Quick Wood Floor Tutorial - By MacKenzie Bruckler

Make sure to scroll down and check out our first CMC  challenge, with a great prize from our sponsor, TGF!
____________________

Welcome MacKenzie, our Guest Contributor this week!  She made a simple, easy to follow tutorial on how to color woods floors that she's kindly shared with us!

MacKenzie Bruckler
 Hi, my name is MacKenzie and I'm a totally obsessed paper crafter from Northern California. When I'm not busy being my kids Mom and my husbands girlfriend, you'll find me upstairs in my purple room stamping away. I first became familiar with Copic markers through several blogs that I read. I loved the bold colors and the subtle shading that could be done. I tried to find them locally, but it was like searching for a unicorn! When my husband asked me what I wanted for my birthday a couple of year ago, I showed him the 72 piece set and he ordered it for me right away.


I've never taken a class or any formal Copic training. Everything that I color is practice and trial by error. I've picked up so many fabulous techniques from online tutorials and my fellow bloggers. I never quite know what an image is going to look like until I'm done. Everyday I have the opportunity to learn something new.

 
 Wood Floors

After I had little Kiki stamped out and colored in, I thought she needed a little something in the background to ground her. I decided to try drawing my first wood floor and took pictures along the way - you know, just in case it came out well and was blog-worthy! Being my first attempt, I was thrilled with how it came out and thought I'd share it with you!


And let me just say that if I can do this, ANYONE can.
Using a ruler and a 0.05 Copic Multi Liner, I drew in a wood floor and a baseboard.


Then I used Copic E49 (Dark Bark) to scribble around the edges and do a little shading under her feet.


Then I blended in some E29 (Burnt Umber).


And filled in the rest with E57 (Light Walnut).
To finish it off, I filled in the baseboard with Y28 (Lionet Gold - not pictured).


I hope that you found this helpful and give it a try!
Thanks for taking the time to stop by my little corner of the world today.
I hope you have a happy day!